i edited this 18-minute video by typing 8 sentences
Here is every sentence, plus a free open-source setup you can run tonight in about 10 minutes.

I haven’t opened a video editor in months.
I still post constantly. The videos still get cut, audio-cleaned, color-graded, captioned, and rendered in 4K.
I just don’t do any of it.
I type a few sentences into a terminal and something else does the work. Usually while I drink a matcha latte and supervise nothing.
I record like it’s a hostage situation, for the record. Ums, restarts, dead air, dad jokes nobody requested. The terminal handles all of it and never once asks how I’m feeling about my performance.
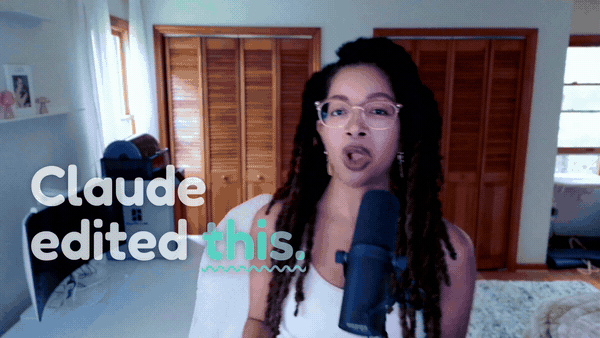
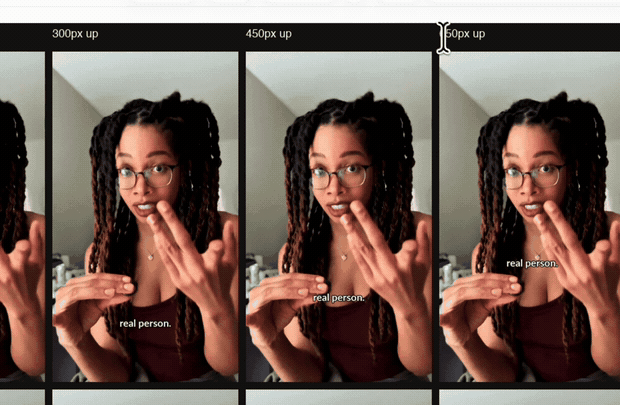
The hook frame. That white overlay was placed by the same tool this post is about. We used the editor to make the proof the editor works.
Here’s the part I need you to hold onto: this is not a video generator. It does not invent a single frame. It’s a real editor that cuts the footage you shot. Transcribe, cut on the word boundary, clean the audio, grade, caption, render 4K. One terminal, plain English, about ten minutes of setup.
That distinction is the whole pitch. It’s also the line between this and the wall of AI slop you’re already sick of.
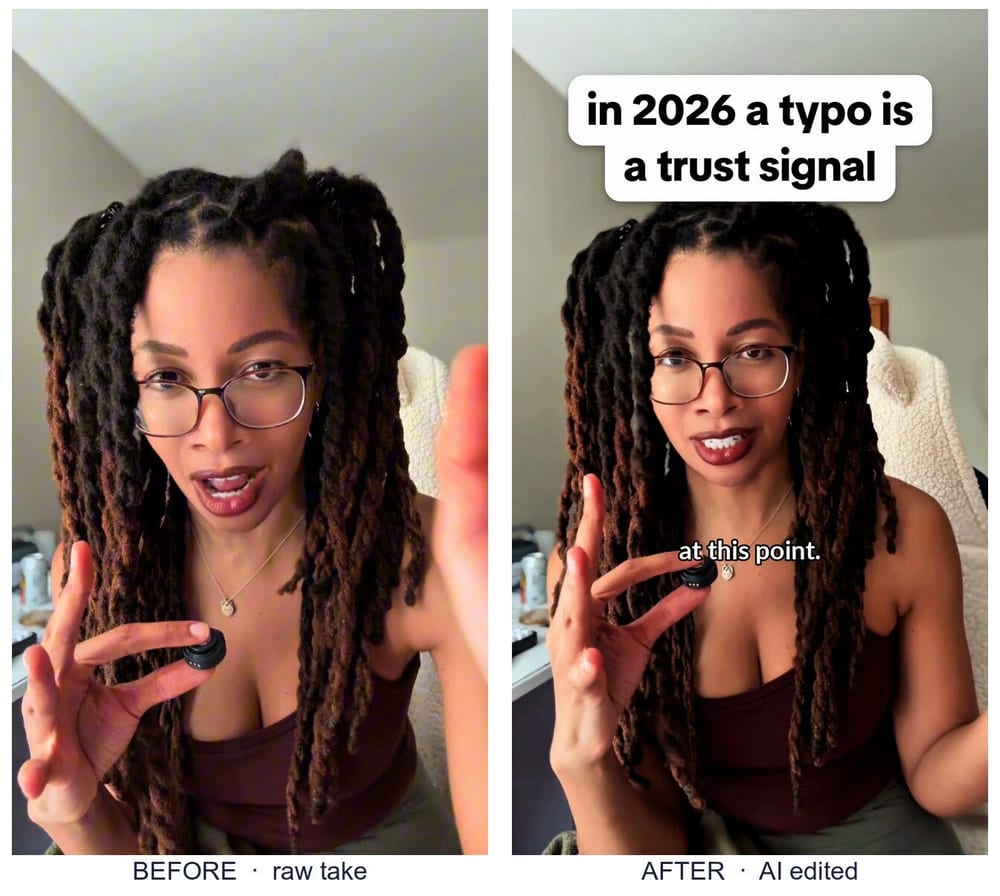
Left: a raw take straight off my phone. Right: same footage, cut, graded, captioned, hooked. Same me, same room, same lighting. I opened zero editing apps to get from left to right.
I made an 18-minute video walking through the whole thing. The number one request in the comments wasn’t “how do I start.” It was “give me the prompts.”So here they are. All eight. Copy-paste, one line of “what it does” on each, in the order you’d actually run them.
If you never watch the video, you still win. This post is the build.
One promise before you scroll. Everything below is the foundation. It cuts, cleans, grades, captions, renders. Boring-good.
Then there’s a second layer that turns “tidy talking head” into “wait, how did she make that.” It’s already shot. It’s in the folder. That’s Part 2, and I’ll show you the receipt near the bottom.
Learn the foundation first. Part 2 stands on it.
Part 0: Why I refuse to open a real editing app
Editing a talking-head video by hand isn’t one hard job. It’s two hundred tiny stupid ones.
Scrub the timeline. Find every “um.” Nudge each cut so it doesn’t clip me mid-syllable. Normalize the audio so I’m not screaming in one clip and whispering in the next. Color grade so I don’t look like I’m filming in a parking garage. Caption every line. Notice the caption is sitting under the TikTok buttons. Do it again.
I post a lot. That was the tax. Every single time.
And I’m an engineer, which comes with a specific disease: if a boring task shows up more than twice, I will burn a weekend automating it to save myself an afternoon. The math never works. I do it anyway.
So I built the workflow once. Now editing is just typing.
The whole thing runs on one idea: edit the transcript, not the timeline. Everything below comes from that.
Part 1: The three tools
Three pieces. Two are free and open source. The third is the one you talk to.
Claude Code is the one you talk to. You type plain English. It drives everything else.
video-use is the actual editor. Free, open source. It does the cutting, the grading, the captions, the audio fades. Claude gives the orders. video-use does the hands.
ElevenLabs Scribe is the transcription. It turns your talking into text with exact, word-level timing. That timing is the entire secret. It’s the only thing you use ElevenLabs for, and the free tier covers it. I pay nothing.
Claude talks, video-use cuts, ElevenLabs listens. video-use does 80% of the work and gets none of the credit. The backend engineer of this whole operation, and you've never heard its name.
Install Claude Code. Open a terminal. Start it up.
The terminal is going to look scary for about four seconds. Then you’ll realize the whole job is pasting prompts and hitting enter.
This first prompt installs the entire editor. You paste it once.
Prompt 1: Install (paste once, scaffolds the whole tool):
Set up the open-source tool at the video-use link for me. Read its INSTALL.md
and do everything it says: clone it, install ffmpeg (another command-line editing
tool) and the Python dependencies, and register it as a skill. If I'm missing
anything it needs, install it for me. I'll paste my ElevenLabs API key when you
ask. Tell me when it's ready, and don't edit anything yet.
What it does: clones video-use, installs ffmpeg and the Python deps, registers it so Claude can use it, and stops before touching a single frame.
Then you wait. At some point it asks for your ElevenLabs key. Paste it exactly when asked. That’s the install. No custom commands, no setup screens.
The actual troubleshooting flow: if you see a red error, you don’t need to understand it. Paste it back and say “fix it.” That’s not me being cute. That’s genuinely the fastest way to unblock yourself.
To get the key: free ElevenLabs account, find speech-to-text, create a key, copy it, paste it when Claude asks.
One prompt in, the whole editor installs itself. Turns out the scariest thing about the terminal is that nothing scary happens.
Part 3: What video-use actually does (so you trust it)
Before the prompts, here’s what’s happening under the hood. This is the part that made me, an engineer with basically zero editing experience, go “oh, this is doing the things a real editor does.”
- It cuts the filler. Every um, every restart.
- It auto-color-grades each segment, and you can override it with your own exact settings.
- It adds a 30-millisecond audio fade at every cut, so there are no clicks or pops.
- It burns in captions in your style, in any Google Font you want.
- And it self-evaluates the render at every cut boundary before it shows you anything. It writes a verify/ folder of waveforms and checks them for spikes.
That last one is the part I’m weirdly proud of. Checking the waveform at every cut for a spike is exactly the tedious quality pass a real editor does and a non-editor would never think to do. The tool just does it, unprompted, with no need for praise.
A good editor is expensive because this stuff is tedious. Which is the exact reason to automate it.
Part 4: The cut (the 80%)
Now the real work. And the real work is mostly reading a list and saying “yep.”
4a. Transcribe and propose the cut. It does NOT cut yet.
Prompt 2: Transcribe + propose the cut:
Transcribe it with word-level timestamps, then propose a cut that removes filler
words, long pauses, dead air, and retakes where I repeated myself. Show me the
cuts as a list of timestamps with a one-line reason each. Do not cut yet. Wait
for my okay.
What it does: writes down every word you said with exact timing, hands you a proposed edit as a readable list of cuts, and waits.
This is the move. Scribe writes every word with a timestamp. video-use reads it and hands me a list: cut the “um” here, cut the dead air there, you said “we’re, we’re, we’re” three times so I kept the last one.
Then it stops. And waits for me.
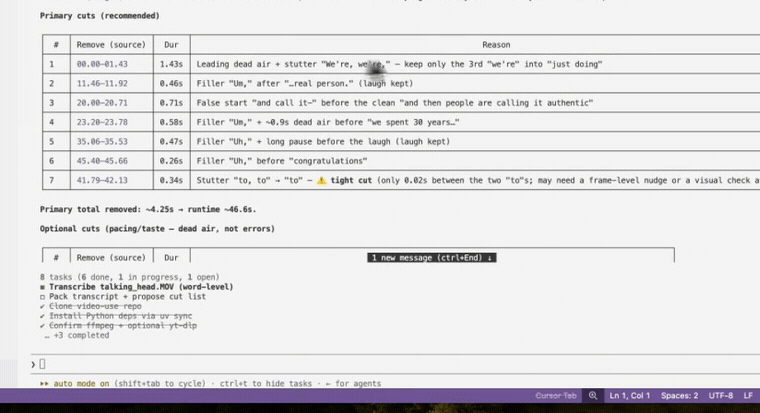
The proposed cut, as a table: position, duration, and the reason for every snip. It kept one of my laughs and filed the reason as "for authenticity." My editor reads me better than I do.
It splits the list into recommended cuts (the actual filler and mistakes) and optional cuts (dead air that isn’t wrong, just tightenable). You decide how aggressive to be.
You read the list and you talk back, in plain English:
- “Don’t take this out, I want it.”
- “It’s a little long, be more aggressive.”
- “Drop the laughs.”
It proposes. It waits. An editor that asks permission. Imagine.
For this demo I fed it a full rambling take, dad jokes and all. The proposed cut took it to 46 seconds. I dragged zero clips.
4b. Make the cut. Snap to word boundaries, no pops.
Happy with the list? Tell it to cut.
Prompt 3: Make the cut:
Make that cut. Never cut mid-word: snap every cut to word boundaries, and add a
tiny fade at every cut so there are no pops. Show me the result by opening it in
QuickTime.
What it does: executes the edit, snaps every cut to a word boundary so you’re never clipped mid-syllable, adds tiny fades to kill the clicks, opens the result so you can watch.
“Snap to word boundaries” means it never chops me off mid-word. “Tiny fade” is about a 30-millisecond audio fade at each cut, which is what kills the little clicks you’d otherwise hear at every edit.
I add “open it in QuickTime” so I can go do something else and it pops the result up when it’s done.
A full ramble, collapsed to 46 seconds. It deleted the dead air, deleted my dad jokes, and never asked how I felt about it.
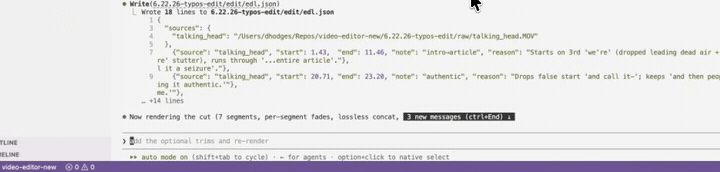
My timeline is a JSON file. That’s not a metaphor. The edit is a list of keep-ranges I can read and tweak in plain text. Once the AI knows when I said each word, editing is just deleting text.
Part 5: Clean the audio (optional)
Notice the cut prompt only asked for cuts and fades. It didn’t touch my levels. On purpose. Audio normalization is a separate ask. Add it only if you want it.
Prompt 4: Clean / normalize the audio (optional):
Loudness-normalize the audio for short-form so I'm not screaming or whispering,
and keep the fades that remove the pops and clicks.
What it does: evens out your loudness for short-form (no shouting, no accidental ASMR) while keeping the click-removing fades.
For short-form you want consistent loudness so you’re not yelling one line and whispering the next. If your raw recording already sits at a good level, skip this entirely.
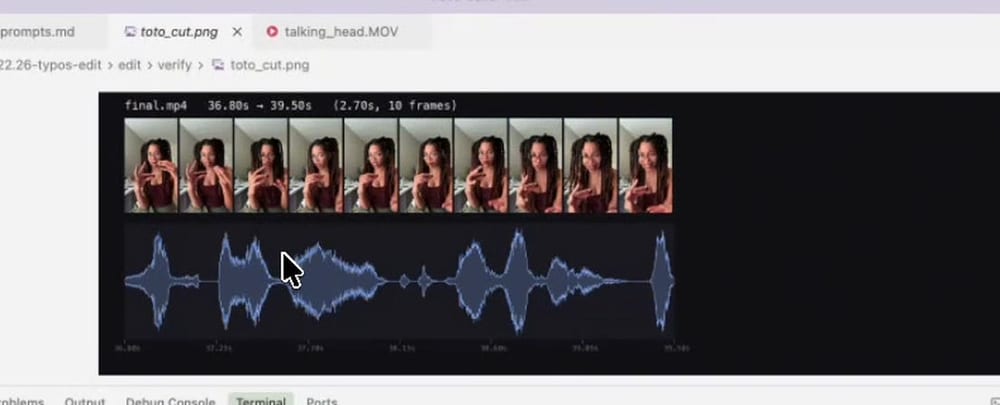
The verify/ folder. It draws the waveform at every cut and checks it for spikes. The obsessive QA pass a real editor does and a normal person has never once thought about.
Part 6: Color grade (decide on a board, before you render)
This is the one I learned the hard way. I used to ask it to grade the whole video, wait for the full render, then discover the grade looked fake or weirdly yellow. Re-render. Discover it again. A death spiral.
The fix: never judge a grade mid-render. Decide it on a still comparison board first, with the exact settings baked into each option.
Prompt 5: Color grade on a comparison board:
Before grading everything, grab two frames and make one labeled comparison image
of the same frame with: (1) no grade, (2) a clean / neutral grade, (3) a warm
grade, (4) punchy with more contrast and color. Show me side by side.
What it does: renders one frame four ways with the real settings labeled on each, so you pick from a still instead of finding out a full render looks fake.
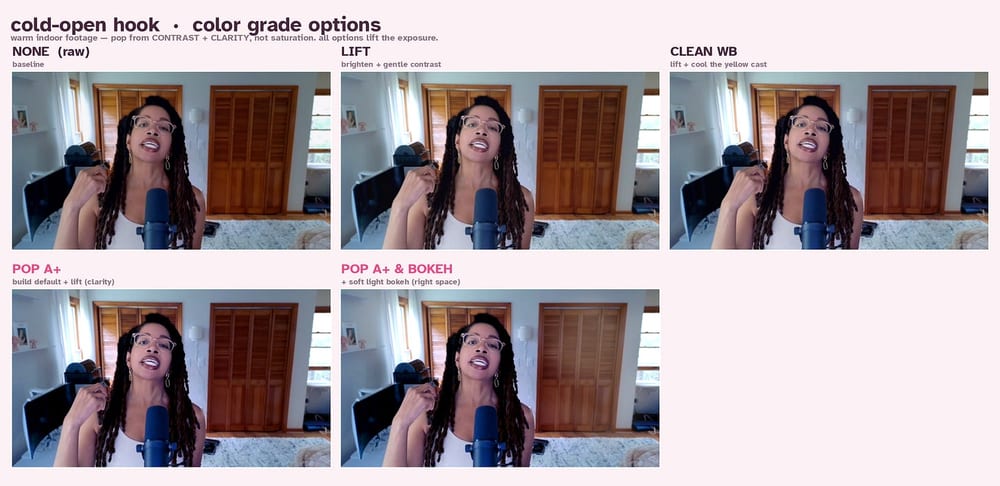
Four grades, same frame, real settings on each. The warm one put me in Breaking Bad in the desert. The punchy one was giving 2012 HDR Lightroom energy. Pick, don’t guess.
Then you just tell it which one:
Do clean and neutral.
This single habit killed the whole “why does the grade look fake” spiral. I’m never judging a grade while a render runs. I’m judging four stills, side by side, in seconds.
Part 7: Captions (your style, your font, your position)
Captions get burned in last, so nothing ever draws over them.
Prompt 6: Burn in captions:
Add subtitles, burned in, synced to my speech, a handful of words at a time,
matched to what I'm saying in a natural, readable way. Download and use the Lato
typeface. Position them near the bottom, just under where I'm holding the mic.
Show me options for positioning before committing to the final subtitle position.
What it does: burns word-synced captions in your chosen Google Font, broken naturally a few words at a time, and shows you positioning options before locking the spot.
Swap Lato for any Google Font. You can also ask for all-caps, or the word-by-word highlighting you see on a lot of TikToks.
The part I bolded, “show me options before committing,” I learned by burning myself enough times that it’s now permanently in the prompt. Always get positions first. It’ll show you a few placements. You pick the one that clears the platform UI, the hearts and the bookmark on the right, the captions at the bottom.
Caption positions, before committing. I put them right under my chin, where people are already looking, and far from the buttons on the right that quietly eat your captions.
Part 8: Render at full resolution (and the text hook)
Free pro tip: keep every preview at 1080p so you can iterate fast, and render 4K once, at the very end. 4K renders are slow. There’s no reason to pay that cost on a draft you’re about to change anyway.
Prompt 7: Render final at full resolution:
Render the final at full resolution, vertical, and open it in QuickTime. The
original is 4K, so preserve that fidelity (don't downscale).
What it does: the one slow, full-quality vertical render at the end, keeping native resolution so 4K stays 4K.
Preview at 1080p. Render final at native. If you shot 4K, the deliverable is 4K. No downscaling, ever.
Last bit of polish: the on-screen text hook for the first few seconds.
Prompt 8: Add the on-screen text hook:
Add an on-screen text hook for the first three seconds. Make it big and readable,
near the top, not covering my face or the captions. Text on a white background
with rounded, connected edges. Use the TikTok Sans font so it looks like the
default TikTok overlay.
What it does: drops a big readable hook at the top for the first ~3 seconds, then removes it on its own, styled to look like the native TikTok overlay.
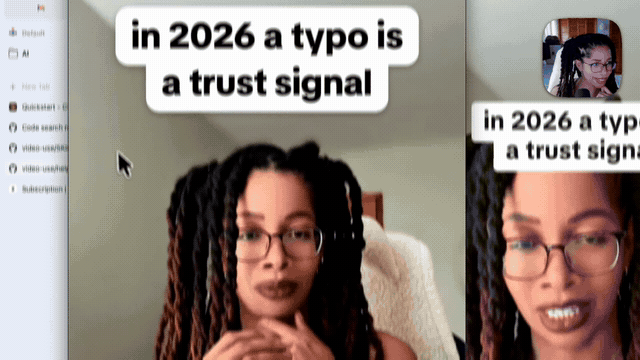
The hook, top of frame, gone by second three. I never told it to drop out. It decided three seconds was plenty. More restraint than I've ever shown on camera.
That’s a finished video. Cut, cleaned, graded, captioned, hooked, 4K. The only thing I did was talk.
Part 9: You’re the director (and how to one-shot the next one)
Two honest things before you go.
One: this is not a video generator. It did not make up a video. It edited real footage I shot on my phone. I directed it. That’s the whole difference, and it’s why I can point this at real engineers who are tired of slop. The receipts are real because the tool only ever touches your real footage.
Two, and this is the important one: those prompts are generic on purpose. Your first few edits won’t sound like you yet. The AI doesn’t know if you’re a fast, snappy, cut-yourself-off YouTuber or a calm, gentle, walk-people-through-it voice. Until you tell it.
So you direct it like a real editor:
- “Cut tighter.”
- “That grade’s too warm.”
- “Leave more breath there.”
- “Speed me up, I’m dragging.”
Then, once you know what you like, you stop retyping it every time. You graduate.
That’s the 8. Here’s one bonus, because it’s the actual payoff:
Bonus prompt: turn your notes into a reusable editor:
Take all my notes and turn them into a master prompt I can copy-paste.
What it does: bundles everything you’ve taught it into one reusable prompt, so your next video starts where this one ended instead of from scratch.
Or go one step further, which is what I actually do:
Build me a skill that captures all of this and runs it automatically next time,
so my next video comes out in my style in one shot, on the first try.
What it does: turns your whole workflow into a saved skill, so the next edit comes out in your grade, your pacing, your audio chain, your whole vibe, first try.
That’s how you go from generic prompts to a one-shot editor tuned to you.
Part 2 is where it gets ridiculous
You now have the foundation: a real editor you run with eight sentences. Cut, clean, grade, caption, render, 4K. If you stopped reading right here, you’d be editing tonight by typing.
But the foundation was never the flex.
The animated intro to the video. Looks like a real channel paid a motion designer for it. It was built from a conversation. No After Effects, no keyframes, no template store. The GIF is the proof, not the promise.did
That animated intro? The one that looks like a real channel paid a motion designer for it? Built from a conversation. No After Effects, no keyframes, no template store.
And it’s not a one-off. The same talk-to-it approach does the whole layer that actually makes short-form pop:
- Smart auto-zooms that punch in on the exact beat you want emphasized, so a flat talking head suddenly has energy. (You judge the punch on a still before it renders, same trick as the grade board, so it’s never too much.)
- B-roll cutaways the tool finds and inserts for you. You don’t go hunting for the clip. It finds the right moment in your own source material and cuts to it, on the word.
- Custom sound effects dropped on the beats that need them.
- Kinetic captions, the ones that move and bounce and highlight word by word, not just the clean static burn-in from Part 1.
This video was the foundation. Part 2 is where it stops looking like “a nice edit” and starts looking like a studio made it. Same move the whole way: you talk, it builds, you direct.
It’s already in the folder. I’m not teasing vapor. The only thing between you and it is whether you’re subscribed when it drops.
So, the honest ask: subscribe, so Part 2 lands in front of you instead of disappearing into the feed. You just got every prompt above for free. The math on one click is not hard.
Resources
- Claude Code (the one you talk to): anthropic.com/claude-code
- video-use (the free, open-source editor): github.com/browser-use/video-use
- ElevenLabs Scribe (word-level transcription, free tier): elevenlabs.io
- Google Fonts (your caption typeface): fonts.google.com
- Prereqs (one time): git, node 22+, python3, ffmpeg, uv
The truth nobody tells you
Everyone’s scared AI is going to flatten every creator into the same gray slop. A lot of what’s shipping is slop, so I get it.
Here’s what building this taught me. The AI didn’t replace my taste. It deleted everything standing between me and my taste.
The filler-trimming, the click-popping audio fades, the screenshot-hunting, the caption-nudging, the parking-garage color grade. None of that was ever the creative part. It was the tax I paid to reach the creative part. Automating the boring 80% didn’t make my videos more generic. It handed me back the hour I now spend on the 20% that’s actually me. The joke, the timing, the take.
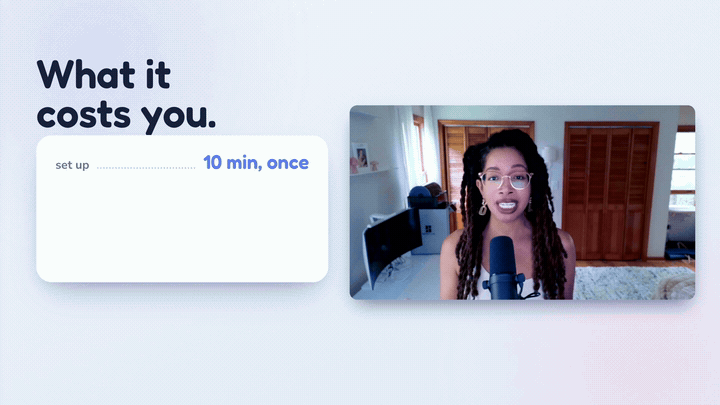
It’s basically free, it runs on your own machine, and it’s about ten minutes of one-time setup. The only skill it requires is being able to say “cut that, it’s too long” out loud.
Go build the editor that does your taste. Then go make the thing only you can make.
I don’t have an editor. I have a terminal. And it ships.
Deonna
P.S. Every prompt from the video is right here, which is the whole point: the video sends you here, and here is where the build actually lives. This video was the foundation. Part 2 is the ridiculous part, it’s already shot, and the receipt is up above. Subscribe so it lands in your inbox the second it drops.
liked this? watch the build.
new builds every week. or get the occasional email below.